Give AWS access with IAM roles
You can connect Logz.io to your AWS account more securely using IAM roles.
This gives Logz.io the appropriate level of access while keeping your AWS account secure.
Connecting an S3 bucket to Logz.io
Enable Logz.io to access your S3 bucket
Logz.io will need the following permissions to your S3 bucket:
- s3:ListBucket - to know which files are in your bucket and to thereby keep track of which files have already been ingested
- s3:GetObject - to download your files and ingest them to your account
To do this, add the following to your IAM policy:
{
    "Version": "2012-10-17",
    "Statement": [
        {
            "Effect": "Allow",
            "Action": [
                "s3:ListBucket"
            ],
            "Resource": [
                "arn:aws:s3:::<BUCKET_NAME>"
            ]
        },
        {
            "Effect": "Allow",
            "Action": [
                "s3:GetObject"
            ],
            "Resource": [
                "arn:aws:s3:::<BUCKET_NAME>/*"
            ]
        }
    ]
}
- Replace
<BUCKET_NAME>with the name of your S3 bucket.
Note that the ListBucket permission is set to the entire bucket and the GetObject permission ends with a /* suffix, so we can get files in subdirectories.
Create a Logz.io-AWS Connector for Archive Setup
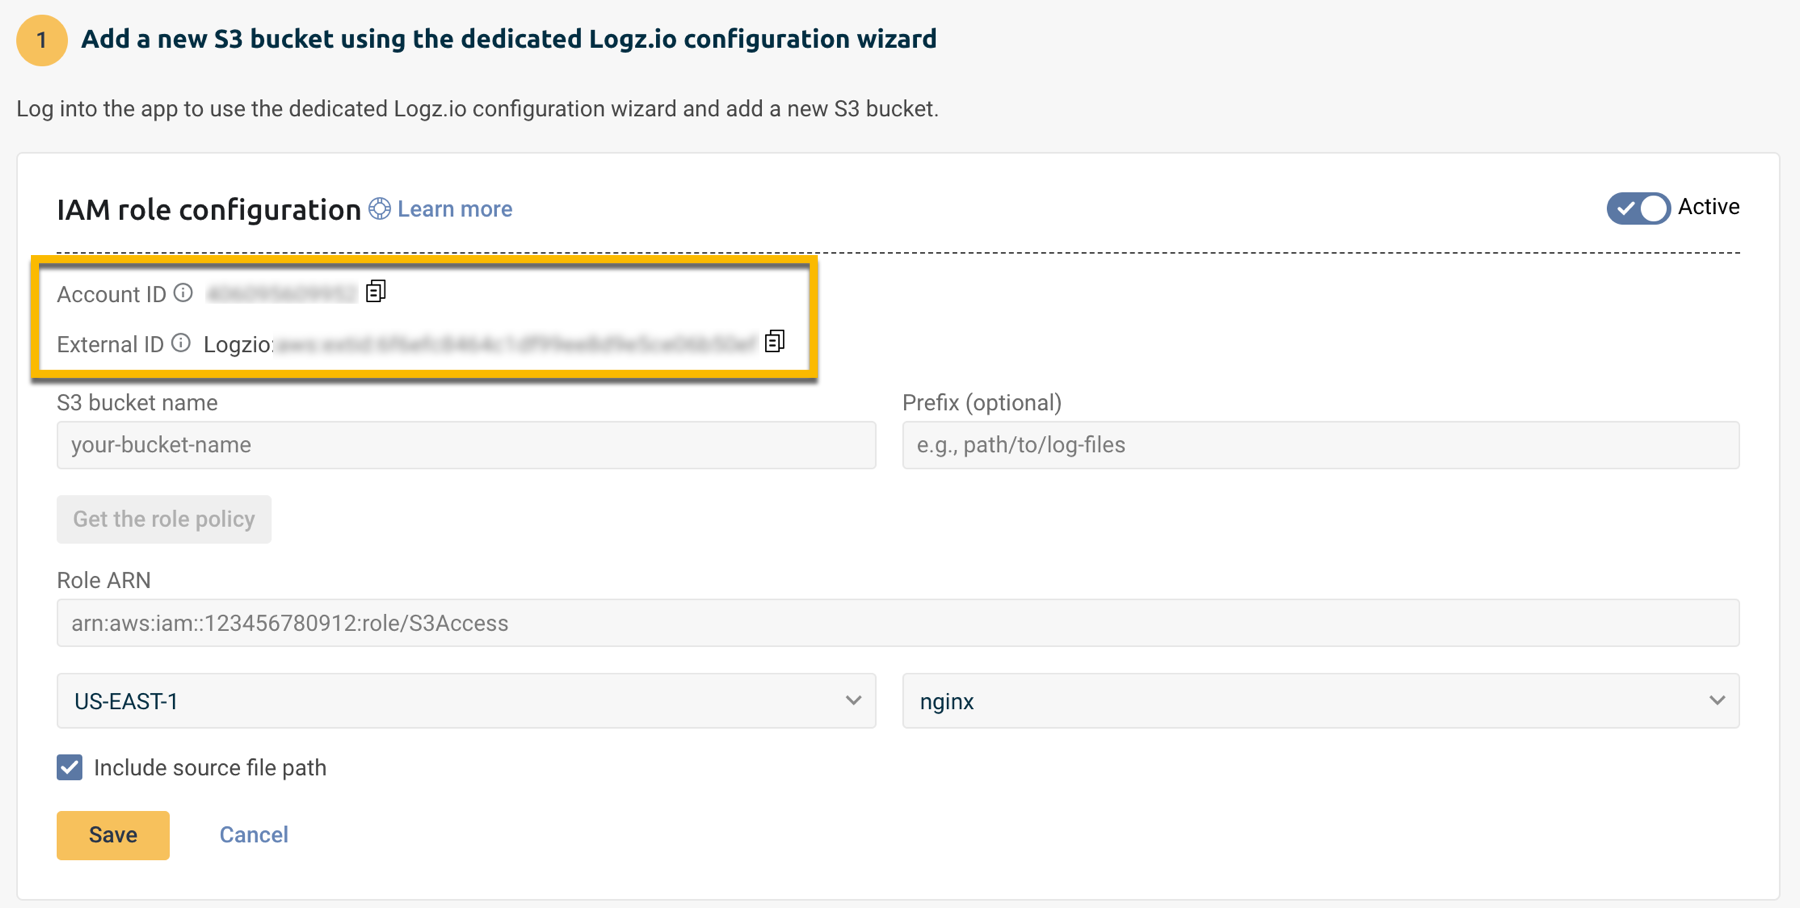
In your Logz.io app, go to the Integration hub and select the relevant AWS resource.
Inside the integration, click + Add a bucket and select the option to Authenticate with a role.
Copy and paste the Account ID and the External ID into your text editor.
Fill in the form to create a new connector:
- Enter the S3 bucket name.
- Enter the Prefix where your logs are stored, if applicable.
Click Get the role policy.
- Review the role policy to confirm the required permissions.
- Paste the policy into your text editor.
Follow the role creation process using the information from the role policy.
Once the role is created, paste the resulting Role ARN within the Archive setup in Logz.io.
Keep this information available so you can use it in AWS.
Create the policy in AWS
Navigate to IAM policies and click Create policy.
In the JSON tab, replace the default JSON with the policy you copied from Logz.io in the previous step.
Click Next to continue.
Give the policy a Name and optional Description, and then click Create policy.
Remember the policy's name—you'll need this in the next step.
Return to the Create role page.
Create the IAM Role in AWS
Go to your IAM roles page in your AWS admin console.
Click Create role to open the Create role wizard.

Click AWS Account > Another AWS account.
Paste the Account ID you copied from Logz.io.
Select Require external ID, and then paste the External ID you've copied and saved in your text editor.
Click Next: Permissions to continue.
Set the trust relationship (Required)
This step is required. If the trust relationship is not configured correctly, Logz.io will not be able to assume the IAM role and access your AWS resources.
After the role is created, go to the Trust relationships tab and verify it looks like this:
{
  "Version": "2012-10-17",
  "Statement": [
    {
      "Effect": "Allow",
      "Principal": {
        "AWS": "arn:aws:iam::<LOGZ_IO_ACCOUNT_ID>:root"
      },
      "Action": "sts:AssumeRole",
      "Condition": {
        "StringEquals": {
          "sts:ExternalId": "logzio:aws:extid:<YOUR_EXTERNAL_ID>"
        }
      }
    }
  ]
}
If the trust relationship is missing or incorrect, Logz.io will not be able to connect to your S3 bucket.
Attach the policy to the role
Type the name of your new policy in the search box.
Find your policy in the filtered list and select its check box.
Click Next to review the new role.
Finalize the role
Give the role a Name and optional Description. We recommend beginning the name with "logzio-" so that it's clear you're using this role with Logz.io.
Click Create role when you're done.
Copy the ARN to Logz.io
In the IAM roles screen, type your new role's name in the search box.
Find your role in the filtered list and click it to go to its summary page.
Copy the role ARN (top of the page). In Logz.io, paste the ARN in the Role ARN field, and then click Save.
Migrating to a new external ID
If you previously set up an IAM role with your own external ID, we recommend updating your Logz.io and AWS configurations to use a Logz.io-generated external ID. This adds security to your AWS account by removing the predictability of any internal naming conventions your company might have.
Before you migrate, you'll need to know where the existing IAM role is used in Logz.io. This is because you'll need to replace any S3 fetcher and Archive & restore configurations that use the existing role.
If your S3 bucket or the logs within it (e.g., CloudTrail logs) are encrypted, you need to add kms:Decrypt permission to the policy on the ARN of the KMS key used for encryption.
- If the role is used in a single Logz.io account: You can update the external ID and replace current Logz.io configurations. See Migrate to the Logz.io external ID in the same role.
- If the role is used with multiple Logz.io accounts: You'll need to create a new role for each account and replace current Logz.io configurations. See Migrate to new IAM roles.
Migrate to the Logz.io external ID in the same role
In this procedure, you'll:
- Replace Logz.io configurations to use the new external ID
- Update the external ID in your IAM role's trust policy
Follow this process only if the IAM role is used in a single Logz.io account.
When you update your IAM role to the Logz.io external ID, all Logz.io configurations that rely on that role will stop working. Before you begin, make sure you know everywhere your existing IAM role is used in Logz.io.
Delete an S3 configuration from Logz.io
Choose an S3 fetcher or Archive & restore configuration to replace.
Copy the S3 bucket name and Role ARN to your text editor, and note the Bucket region. If this is an S3 fetcher, copy the path Prefix as well, and note the Log type.
Delete the configuration.
Replace the configuration
If this is for an S3 fetcher, click Add a bucket > Authenticate with a role.
Recreate your configuration with the values you copied to your text editor, and copy the External ID (you'll paste it in AWS in the next step).
Replace the external ID in your IAM role
Browse to the IAM roles page. Open the role used by the configuration you deleted in a previous step.

Open the Trust relationships tab and click Edit trust relationship to open the policy document JSON.
Find the line with the key sts:ExternalId,
and replace the value with the Logz.io external ID you copied to your text editor.
For example,
if your account's external ID is
logzio:aws:extid:example0nktixxe8q,
you would see this:
"sts:ExternalId": "logzio:aws:extid:example0nktixxe8q"
Saving the trust policy at this point will immediately change your role's external ID. Any other Logz.io configurations that use this role will stop working until you update them.
Click Update Trust Policy to use the Logz.io external ID for this role.
Save the new S3 configuration in Logz.io
Save the configuration in Logz.io:
- For an S3 fetcher: Click Save
- For Archive & restore: Click Start archiving
You'll see a success message if Logz.io authenticated and connected to your S3 bucket.
If the connection failed, double-check your credentials in Logz.io and AWS.
(If needed) Replace other configurations that use this role
If there are other S3 fetcher or Archive & restore configurations in this account that use the same role, replace those configurations with the updated external ID.
Logz.io generates one external ID per account, so you won't need to change the role again.
Migrate to new IAM roles
In this procedure, you'll:
- Create a new IAM role with the new external ID
- Replace Logz.io configurations to use the new role
You'll repeat this procedure for each Logz.io account where you need to fetch or archive logs in an S3 bucket.
Delete an S3 configuration from Logz.io
Choose an S3 fetcher or Archive & restore configuration to replace.
Copy the S3 bucket name to your text editor, and make a note of the Bucket region. If this is an S3 fetcher, copy the path Prefix as well, and make a note of the Log type.
Delete the configuration.
Replace the configuration
If this is for an S3 fetcher, click Add a bucket, and click Authenticate with a role.
Recreate your configuration with the values you copied to your text editor, and copy the External ID (you'll paste it in AWS later).
Set up your new IAM role
Using the information you copied to your text editor, follow the steps in Grant access to an S3 bucket.
Continue with this procedure when you're done.
(If needed) Replace other configurations that use this role
If there are other S3 fetcher or Archive & restore configurations in this account that use the same role, repeat the steps, and use the role ARN you copied to your text editor.
For configurations in other Logz.io accounts, repeat this procedure from the beginning.
Minimum IAM permissions required for metric shipping
To ship metrics from AWS services to Logz.io, you need to configure the minimum required permissions as follows:
- Amazon S3:
s3:CreateBuckets3:DeleteBuckets3:PutObjects3:GetObjects3:DeleteObjects3:ListBuckets3:AbortMultipartUploads3:GetBucketLocation
- AWS Lambda:
lambda:CreateFunctionlambda:DeleteFunctionlambda:InvokeFunctionlambda:GetFunctionlambda:UpdateFunctionCodelambda:UpdateFunctionConfigurationlambda:AddPermissionlambda:RemovePermissionlambda:ListFunctions
- Amazon CloudWatch:
cloudwatch:PutMetricDatacloudwatch:PutMetricStreamlogs:CreateLogGrouplogs:CreateLogStreamlogs:PutLogEventslogs:DeleteLogGrouplogs:DeleteLogStream
- AWS Kinesis Firehose:
firehose:CreateDeliveryStreamfirehose:DeleteDeliveryStreamfirehose:PutRecordfirehose:PutRecordBatch
- IAM:
iam:PassRoleiam:CreateRoleiam:DeleteRoleiam:AttachRolePolicyiam:DetachRolePolicyiam:GetRoleiam:CreatePolicyiam:DeletePolicyiam:GetPolicy
- Amazon CloudFormation:
cloudformation:CreateStackcloudformation:DeleteStackcloudformation:UpdateStackcloudformation:DescribeStackscloudformation:DescribeStackEventscloudformation:ListStackResources